AOP:
指在程序运行期间动态的将某段代码切入到指定方法指定位置进行运行的编程方式【动态代理】
实现
1、导包
    <dependency>
      <groupId>org.springframework</groupId>
      <artifactId>spring-context</artifactId>
      <version>5.1.6.RELEASE</version>
    </dependency>

    <dependency>
      <groupId>org.springframework</groupId>
      <artifactId>spring-aspects</artifactId>
      <version>5.1.6.RELEASE</version>
    </dependency>
2、写配置
1、定义一个业务逻辑类(MathCalculator);在业务逻辑运行的时候将日志进行打印(方法运行之前、方法运行结束、方法出现异常…等)。就是要切入进去的业务逻辑代码。
public class MathCalculator {

    public MathCalculator() {
        System.out.println("mathCalculator constructor");
    }

    public int div(int a, int b) {
        System.out.println("div 开始执行----");
        int result = a / b;
        return result;
    }
}
2、定义一个日志切面类(MathCalculatorAop):切面类里面的方法需要动态感知MathCalculator.div方法运行到哪里了然后执行对应的方法
//必须告诉Spring哪个类是切面类,给切面类上加上 @Aspect
@Aspect
public class MathCalculatorAop {

    public MathCalculatorAop() {
        System.out.println("mathCalculatoraop constructor");
    }

    //切入点表达式抽取
    @Pointcut("execution(public int com.lly.Aop.MathCalculator.*(..))")
    public void joinpoint(){
    }
    //给切面类的目标方法标注何时何地运行
    @Before("joinpoint()")
    public void logstart(JoinPoint joinPoint){
        System.out.println(joinPoint.getSignature().getName() + "方法前置通知logstart……"+"参数为"+ Arrays.asList(joinPoint.getArgs()));
    }

    @After("joinpoint()")
    public void logend(JoinPoint joinPoint){
        System.out.println(joinPoint.getSignature().getName() + "方法后置通知logend……");
    }

    @AfterReturning(value = "joinpoint()", returning = "result")
    public void logAfterReturn(JoinPoint joinPoint,Object result){
        System.out.println(joinPoint.getSignature().getName() + "方法返回通知logAfterReturn……返回值为"+result);
    }

    @AfterThrowing(value = "joinpoint()", throwing = "e")
    public void logAfterThrowing(JoinPoint joinPoint,Exception e){
        System.out.println(joinPoint.getSignature().getName() + "方法异常通知logAfterThrowing……出现异常:"+e);
    }
}
通知方法:
        前置通知(@Before):logstart ---目标方法运行(div)运行之前执行
        后置通知(@After):logend --- 目标方法运行(div)运行之后执行(无论方法正常结束还是异常结束,都会执行)
        返回通知(@AfterReturning):logAfterReturn --- 目标方法运行(div)正常返回之后执行
        异常通知(@AfterThrowing):logAfterThrowing --- 目标方法运行(div)出现异常后执行
        环绕通知(@Around):动态代理,手动推进目标方法运行(joinPoint.procced())
3、将切面类和业务逻辑类(目标方法所在的类) 都加入到IOC容器中
//给配置类中标注 @EnableAspectJAutoProxy 开启基于注解的AOP模式 【最关键的一步】
//在Spring中很多的@EnableXXX; 都是开启某一项功能
@EnableAspectJAutoProxy
@Configuration
public class Config {

    @Bean
    public MathCalculator mathCalculator() {
        return new MathCalculator();
    }

    @Bean
    public MathCalculatorAop mathCalculatorAop() {
        return new MathCalculatorAop();
    }
}
3、测试
    @Test
    public void test01(){
        AnnotationConfigApplicationContext context = new AnnotationConfigApplicationContext(Config.class);
        MathCalculator mathCalculator = context.getBean(MathCalculator.class);
        int div = mathCalculator.div(1, 1);
        //异常情况
        //int div = mathCalculator.div(1, 0);

    }

    输出:
    mathCalculator constructor
    mathCalculatoraop constructor
    div方法前置通知logstart……参数为[1, 1]
    div 开始执行----
    div方法后置通知logend……
    div方法返回通知logAfterReturn……返回值为1

    异常输出:
    mathCalculator constructor
    mathCalculatoraop constructor
    div方法前置通知logstart……参数为[1, 0]
    div 开始执行----
    div方法后置通知logend……
    div方法异常通知logAfterThrowing……出现异常:java.lang.ArithmeticException: / by zero
ps:在Spring 5.3.0 之后,后置通知的顺序是在最后面的,无论是否出现异常。
总结
1、将业务逻辑组件和切面类都加入到容器中;告诉Spring哪个是切面类(@Aspect)

2、在切面类上的每个通知方法上标注通知注解,告诉spring何时何地运行(通知方法和切入点表达式)

3、开启基于注解的AOP模式给配置类中标注 @EnableAspectJAutoProxy
AOP原理
AOP原理:【看给容器中注册了什么组件,这个组件什么时候工作,这个组件的功能是什么?】
@EnableAspectJAutoProxy
给配置类标注了@EnableAspectJAutoProxy注解,就能开启基于注解的AOP模式,所以,看@EnableAspectJAutoProxy干了什么。
@Import(AspectJAutoProxyRegistrar.class)
public @interface EnableAspectJAutoProxy {}
@Import(AspectJAutoProxyRegistrar.class):给容器中导入AspectJAutoProxyRegistrar
AspectJAutoProxyRegistrar.class
class AspectJAutoProxyRegistrar implements ImportBeanDefinitionRegistrar {

	@Override
	public void registerBeanDefinitions(
			AnnotationMetadata importingClassMetadata, BeanDefinitionRegistry registry) {

		AopConfigUtils.registerAspectJAnnotationAutoProxyCreatorIfNecessary(registry);
利用AspectJAutoProxyRegistrar自定义给容器中注册bean(AnnotationAwareAspectJAutoProxyCreator)
registerAspectJAnnotationAutoProxyCreatorIfNecessary
	@Nullable
	public static BeanDefinition registerAspectJAnnotationAutoProxyCreatorIfNecessary(
			BeanDefinitionRegistry registry, @Nullable Object source) {

		return registerOrEscalateApcAsRequired(AnnotationAwareAspectJAutoProxyCreator.class, registry, source);
	}
注册了—> internalAutoProxyCreator(bean名) = AnnotationAwareAspectJAutoProxyCreator(类型)

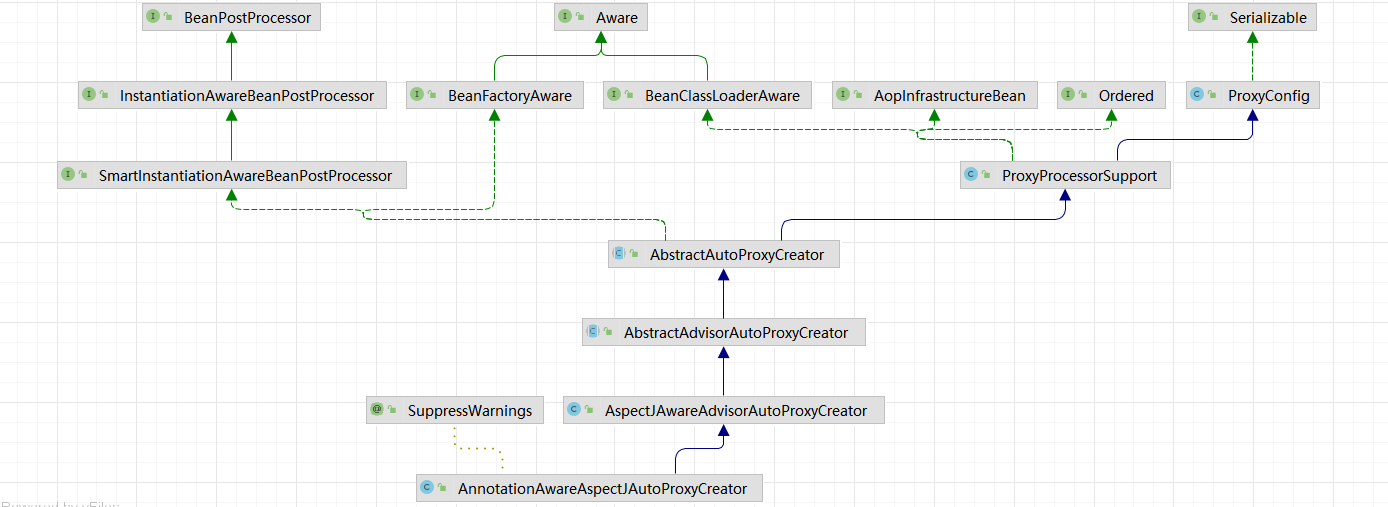
AnnotationAwareAspectJAutoProxyCreator的实现继承关系:
AnnotationAwareAspectJAutoProxyCreator
->继承: AspectJAwareAdvisorAutoProxyCreator
    ->继承: AbstractAdvisorAutoProxyCreator
        ->继承: AbstractAutoProxyCreator
            ->实现:SmartInstantiationAwareBeanPostProcessor,BeanFactoryAware
    我们关注后置处理器(在bean初始化完成前后做事情)、自动装配 BeanFactoryAware

注册AnnotationAwareAspectJAutoProxyCreator流程
1、传入配置类
AnnotationConfigApplicationContext context = new AnnotationConfigApplicationContext(Config.class);
debug运行
2、注册配置类,调用refresh(),刷新容器
public void refresh() throws BeansException, IllegalStateException {
    synchronized (this.startupShutdownMonitor) {
        // Prepare this context for refreshing.
        prepareRefresh();

        // Tell the subclass to refresh the internal bean factory.
        //注册bean的定义信息,这个在之前的Spring源码中有,忘记了可以回头看看
        ConfigurableListableBeanFactory beanFactory = obtainFreshBeanFactory();

        // Prepare the bean factory for use in this context.
        prepareBeanFactory(beanFactory);

        try {
            // Allows post-processing of the bean factory in context subclasses.
            postProcessBeanFactory(beanFactory);

            // Invoke factory processors registered as beans in the context.
            //执行注册BeanFactoryPostProcessors
            invokeBeanFactoryPostProcessors(beanFactory);

            // Register bean processors that intercept bean creation.
            //注册BeanPostProcessors
            registerBeanPostProcessors(beanFactory);

            // Initialize message source for this context.
            initMessageSource();

            // Initialize event multicaster for this context.
            initApplicationEventMulticaster();

            // Initialize other special beans in specific context subclasses.
            onRefresh();

            // Check for listener beans and register them.
            registerListeners();

            // Instantiate all remaining (non-lazy-init) singletons.
            //实例化剩下的bean(除开懒加载的)
            finishBeanFactoryInitialization(beanFactory);

            // Last step: publish corresponding event.
            finishRefresh();
        }
这里走debug,由于AnnotationAwareAspectJAutoProxyCreator实现了BeanPostProcessor,所以关注registerBeanPostProcessors(beanFactory);方法。
3、registerBeanPostProcessors(beanFactory);注册bean的后置处理器来方便拦截bean的创建
public static void registerBeanPostProcessors(
			ConfigurableListableBeanFactory beanFactory, AbstractApplicationContext applicationContext) {

1、先获取ioc容器中已经定义了的需要创建对象的所有BeanPostProcessor

    String[] postProcessorNames = beanFactory.getBeanNamesForType(BeanPostProcessor.class, true, false);

2、给容器中加别的BeanPostProcessor

    注册 Register BeanPostProcessorChecker
    int beanProcessorTargetCount = beanFactory.getBeanPostProcessorCount() + 1 + postProcessorNames.length;
    beanFactory.addBeanPostProcessor(new BeanPostProcessorChecker(beanFactory, beanProcessorTargetCount));

    // 分割 BeanPostProcessors根据其是否实现PriorityOrdered,Ordered,以及剩下什么都没实现的。
    //分别加入到不同的集合中
    List<BeanPostProcessor> priorityOrderedPostProcessors = new ArrayList<>();
    List<BeanPostProcessor> internalPostProcessors = new ArrayList<>();
    List<String> orderedPostProcessorNames = new ArrayList<>();
    List<String> nonOrderedPostProcessorNames = new ArrayList<>();
    for (String ppName : postProcessorNames) {
        if (beanFactory.isTypeMatch(ppName, PriorityOrdered.class)) {
            BeanPostProcessor pp = beanFactory.getBean(ppName, BeanPostProcessor.class);
            priorityOrderedPostProcessors.add(pp);
            if (pp instanceof MergedBeanDefinitionPostProcessor) {
                internalPostProcessors.add(pp);
            }
        }
        else if (beanFactory.isTypeMatch(ppName, Ordered.class)) {
            orderedPostProcessorNames.add(ppName);
        }
        else {
            nonOrderedPostProcessorNames.add(ppName);
        }
    }
3、优先注册实现了PriorityOrdered接口的BeanPostProcessor

    // 首先注册实现了PriorityOrdered接口的BeanPostProcessors,
    sortPostProcessors(priorityOrderedPostProcessors, beanFactory);
    registerBeanPostProcessors(beanFactory, priorityOrderedPostProcessors);

4、再给容器中注册实现了Ordered接口的BeanPostProcessor

    // 注册实现了 Ordered接口的BeanPostProcessors .internalAutoProxyCreator实现了Ordered接口,所以走这里
    List<BeanPostProcessor> orderedPostProcessors = new ArrayList<>();
    for (String ppName : orderedPostProcessorNames) {
        BeanPostProcessor pp = beanFactory.getBean(ppName, BeanPostProcessor.class);
        orderedPostProcessors.add(pp);
        if (pp instanceof MergedBeanDefinitionPostProcessor) {
            internalPostProcessors.add(pp);
        }
    }
    sortPostProcessors(orderedPostProcessors, beanFactory);
    registerBeanPostProcessors(beanFactory, orderedPostProcessors);
5、注册没实现优先级接口的BeanPostProcessors

    // Now, register all regular BeanPostProcessors.
    List<BeanPostProcessor> nonOrderedPostProcessors = new ArrayList<>();
    for (String ppName : nonOrderedPostProcessorNames) {
        BeanPostProcessor pp = beanFactory.getBean(ppName, BeanPostProcessor.class);
        nonOrderedPostProcessors.add(pp);
        if (pp instanceof MergedBeanDefinitionPostProcessor) {
            internalPostProcessors.add(pp);
        }
    }
    registerBeanPostProcessors(beanFactory, nonOrderedPostProcessors);

6、重新注册所有的BeanPostProcessors(其实就是加入到集合的过程)
    // Finally, re-register all internal BeanPostProcessors.
    sortPostProcessors(internalPostProcessors, beanFactory);
    registerBeanPostProcessors(beanFactory, internalPostProcessors);

    // Re-register post-processor for detecting inner beans as ApplicationListeners,
    // moving it to the end of the processor chain (for picking up proxies etc).
    beanFactory.addBeanPostProcessor(new ApplicationListenerDetector(applicationContext));
}
3.1 创建BeanPostProcessor对象
注册BeanPostProcessor,实际上就是创建BeanPostProcessor对象,保存在容器中
即上面的第4点:
BeanPostProcessor pp = beanFactory.getBean(ppName, BeanPostProcessor.class);
创建bean名为internalAutoProxyCreator的BeanPostProcessor
【类型为AnnotationAwareAspectJAutoProxyCreator】
过程:
beanFactory.getBean(ppName, BeanPostProcessor.class);
||
doGetBean(name, requiredType, null, false);
||
getSingleton(beanName);
第一次getSingleton;先从缓存中获取当前bean,如果能获取到,说明bean是之前被创建过的;直接使用,否则再创建;因为我们是刚启动,所以没有bean实例缓存。
||
getParentBeanFactory();
检查是否在工厂中有这个bean的定义信息,有就能用这个定义信息创建bean;这里我们也没有
||
sharedInstance = getSingleton(beanName, () -> {
						try {
							return createBean(beanName, mbd, args);
						}
第二次调用getSingleton,使用Lambda 表达式创建bean
3.2 createBean
粗略得看下就行,不太深入的不用关注太多,这里只关注两个地方

@Override
  protected Object createBean(String beanName, RootBeanDefinition mbd, @Nullable Object[] args)
          throws BeanCreationException {

      if (logger.isTraceEnabled()) {
          logger.trace("Creating instance of bean '" + beanName + "'");
      }
      RootBeanDefinition mbdToUse = mbd;

      // Make sure bean class is actually resolved at this point, and
      // clone the bean definition in case of a dynamically resolved Class
      // which cannot be stored in the shared merged bean definition.
      Class<?> resolvedClass = resolveBeanClass(mbd, beanName);
      if (resolvedClass != null && !mbd.hasBeanClass() && mbd.getBeanClassName() != null) {
          mbdToUse = new RootBeanDefinition(mbd);
          mbdToUse.setBeanClass(resolvedClass);
      }

      // Prepare method overrides.
      try {
          mbdToUse.prepareMethodOverrides();
      }
      catch (BeanDefinitionValidationException ex) {
          throw new BeanDefinitionStoreException(mbdToUse.getResourceDescription(),
                  beanName, "Validation of method overrides failed", ex);
      }

      try {
      1、尝试让BeanPostProcessors返回一个代理对象,从而替代让bean实例化
          // Give BeanPostProcessors a chance to return a proxy instead of the target bean instance.
          Object bean = resolveBeforeInstantiation(beanName, mbdToUse);
          if (bean != null) {
              return bean;
          }
      }
      catch (Throwable ex) {
          throw new BeanCreationException(mbdToUse.getResourceDescription(), beanName,
                  "BeanPostProcessor before instantiation of bean failed", ex);
      }

      try {
      2、如果前一步不能返回创建一个代理,那么只能乖乖的实例化

          Object beanInstance = doCreateBean(beanName, mbdToUse, args);
          if (logger.isTraceEnabled()) {
              logger.trace("Finished creating instance of bean '" + beanName + "'");
          }
          return beanInstance;
      }
      catch (BeanCreationException | ImplicitlyAppearedSingletonException ex) {
          // A previously detected exception with proper bean creation context already,
          // or illegal singleton state to be communicated up to DefaultSingletonBeanRegistry.
          throw ex;
      }
      catch (Throwable ex) {
          throw new BeanCreationException(
                  mbdToUse.getResourceDescription(), beanName, "Unexpected exception during bean creation", ex);
      }
  }
resolveBeforeInstantiation这个放在后面在说,因为在容器刚注册的时候,
并没有什么BeanPostProcessors能返回一个代理,都是返回null。所以最后还是得乖乖的创建bean。
3.3 doCreateBean
protected Object doCreateBean(final String beanName, final RootBeanDefinition mbd, final @Nullable Object[] args)
			throws BeanCreationException {

1、创建bean。bean的实例化
      // Instantiate the bean.
      BeanWrapper instanceWrapper = null;
      if (mbd.isSingleton()) {
          instanceWrapper = this.factoryBeanInstanceCache.remove(beanName);
      }
      if (instanceWrapper == null) {
          instanceWrapper = createBeanInstance(beanName, mbd, args);
      }
      final Object bean = instanceWrapper.getWrappedInstance();
      Class<?> beanType = instanceWrapper.getWrappedClass();
      if (beanType != NullBean.class) {
          mbd.resolvedTargetType = beanType;
      }

修改合并的bean定义。
      // Allow post-processors to modify the merged bean definition.
      synchronized (mbd.postProcessingLock) {
          if (!mbd.postProcessed) {
              try {
                  applyMergedBeanDefinitionPostProcessors(mbd, beanType, beanName);
              }
              catch (Throwable ex) {
                  throw new BeanCreationException(mbd.getResourceDescription(), beanName,
                          "Post-processing of merged bean definition failed", ex);
              }
              mbd.postProcessed = true;
          }
      }

加入缓存,解决循环引用问题
      // Eagerly cache singletons to be able to resolve circular references
      // even when triggered by lifecycle interfaces like BeanFactoryAware.
      boolean earlySingletonExposure = (mbd.isSingleton() && this.allowCircularReferences &&
              isSingletonCurrentlyInCreation(beanName));
      if (earlySingletonExposure) {
          if (logger.isTraceEnabled()) {
              logger.trace("Eagerly caching bean '" + beanName +
                      "' to allow for resolving potential circular references");
          }
          如果是要进行实例暴露的话,会加入进缓存里,之后可以第一次getSingleton直接获取
          一般容器自带的bean都会加入进来

          addSingletonFactory(beanName, () -> getEarlyBeanReference(beanName, mbd, bean));
      }
初始化bean

      // Initialize the bean instance.
      Object exposedObject = bean;
      try {
      2、populateBean;给bean的各种属性赋值
          populateBean(beanName, mbd, instanceWrapper);
      3、初始化bean
          exposedObject = initializeBean(beanName, exposedObject, mbd);
      }
      catch (Throwable ex) {
          if (ex instanceof BeanCreationException && beanName.equals(((BeanCreationException) ex).getBeanName())) {
              throw (BeanCreationException) ex;
          }
……
3.4 initializeBean
  protected Object initializeBean(final String beanName, final Object bean, @Nullable RootBeanDefinition mbd) {
      if (System.getSecurityManager() != null) {
          AccessController.doPrivileged((PrivilegedAction<Object>) () -> {
              invokeAwareMethods(beanName, bean);
              return null;
          }, getAccessControlContext());
      }
      else {
      ------------------------------------------
      这里会回调AbstractAdvisorAutoProxyCreator的setBeanFactory(),为什么调父类?因为
      AnnotationAwareAspectJAutoProxyCreator没有重写。
      但在setBeanFactory()又会调用initBeanFactory()方法,但此方法在AnnotationAwareAspectJAutoProxyCreator
      已经重写了,所以又会调用子类AnnotationAwareAspectJAutoProxyCreator.initBeanFactory()
      ------------------------------------------
          invokeAwareMethods(beanName, bean);//此方法具体在最后
      }

      Object wrappedBean = bean;
      if (mbd == null || !mbd.isSynthetic()) {

      应用后置处理器的postProcessBeforeInitialization()

          wrappedBean = applyBeanPostProcessorsBeforeInitialization(wrappedBean, beanName);
      }

      try {

      执行bean自定义的初始化方法,比如@Bean指定的init方法。
          invokeInitMethods(beanName, wrappedBean, mbd);
      }
      catch (Throwable ex) {
          throw new BeanCreationException(
                  (mbd != null ? mbd.getResourceDescription() : null),
                  beanName, "Invocation of init method failed", ex);
      }
      if (mbd == null || !mbd.isSynthetic()) {

      应用后置处理器的postProcessAfterInitialization()

          wrappedBean = applyBeanPostProcessorsAfterInitialization(wrappedBean, beanName);
      }

      return wrappedBean;
  }

  private void invokeAwareMethods(final String beanName, final Object bean) {
      if (bean instanceof Aware) {
          if (bean instanceof BeanNameAware) {
              ((BeanNameAware) bean).setBeanName(beanName);
          }
          if (bean instanceof BeanClassLoaderAware) {
              ClassLoader bcl = getBeanClassLoader();
              if (bcl != null) {
                  ((BeanClassLoaderAware) bean).setBeanClassLoader(bcl);
              }
          }
          if (bean instanceof BeanFactoryAware) {
              ((BeanFactoryAware) bean).setBeanFactory(AbstractAutowireCapableBeanFactory.this);
          }
      }
  }
3.4.1 initBeanFactory()
在上面中说到会调用initBeanFactory()方法,这个方法的用处是什么呢?
  @Override
  protected void initBeanFactory(ConfigurableListableBeanFactory beanFactory) {
  //调用父类的initBeanFactory;
      super.initBeanFactory(beanFactory);
      if (this.aspectJAdvisorFactory == null) {

      根据传入的BeanFactory创建AspectJExpressionPointcut实例,用于bean切入点处理以及ClassLoader解析。

          this.aspectJAdvisorFactory = new ReflectiveAspectJAdvisorFactory(beanFactory);
      }

      之后用于存放切面的地方,就是自己编写的切面类,有哪些通知方法,之后会被扫描加入其中

      this.aspectJAdvisorsBuilder =
              new BeanFactoryAspectJAdvisorsBuilderAdapter(beanFactory, this.aspectJAdvisorFactory);
  }
registerBeanPostProcessors(beanFactory)结束
以上就是registerBeanPostProcessors(beanFactory);的全过程。
AnnotationAwareAspectJAutoProxyCreator也会在此创建完成,然而AnnotationAwareAspectJAutoProxyCreator
是BeanPostProcessors,BeanPostProcessors是在bean初始化前后执行的,那么其执行时机是什么时候呢?
AnnotationAwareAspectJAutoProxyCreator执行时机
回到refresh()方法,BeanPostProcessors注册完之后就是国际化;监听器等的初始化,直到finishBeanFactoryInitialization(beanFactory);—>完成剩下bean的初始化(不包括懒加载),step into。
粗略过程:
finishBeanFactoryInitialization(beanFactory);
||
beanFactory.preInstantiateSingletons();
||
List<String> beanNames = new ArrayList<>(this.beanDefinitionNames);
	for (String beanName : beanNames) {
    ……
    getBean(beanName);
    }
从beanDefinitionNames加载所有已定义的bean信息,只是定义,还没实例化
调用getBean(beanName);创建bean

然后的步骤就和 3.1 的一样了
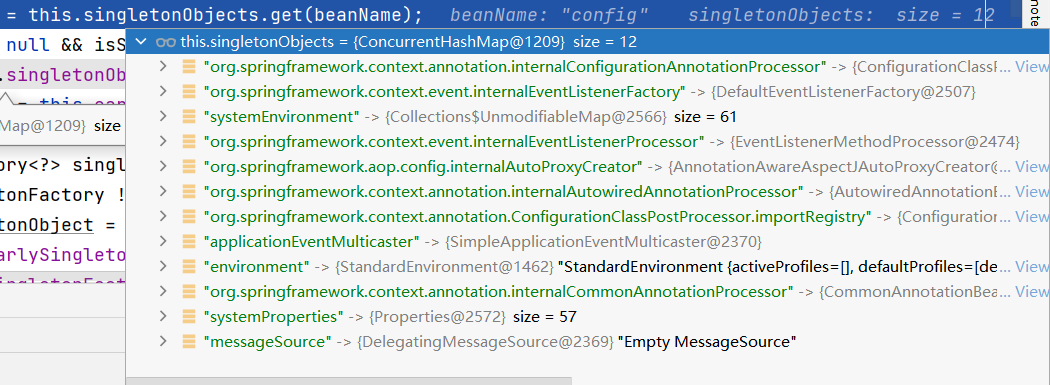
一般容器自带的那些bean,都是已经实例化并放在缓存中了的,所以在第一次getSingleton就能获取到
见 3.3 addSingletonFactory

在能获取到已创建的bean实例(不是我们自己加入的实例)时,BeanPostProcessors是没有机会执行的,或者说这些bean在实例化的时候就有其他的BeanPostProcessors对它操作过一次了,只是那个时候,我们自己创建的BeanPostProcessors还没注册,所以没能参与其中。
当要实例化到我们自行加入的bean实例时,会走3.1之后的步骤,3.2的第1步:

config是配置类、mathCalculator是业务逻辑、mathCalculatorAop是切面类
以下的流程先说config。
1、resolveBeforeInstantiation
解析BeforeInstantiation。希望后置处理器在此能返回一个代理对象;如果能返回代理对象就使用,如果不能就实例化。
@Nullable
  protected Object resolveBeforeInstantiation(String beanName, RootBeanDefinition mbd) {
      Object bean = null;
      if (!Boolean.FALSE.equals(mbd.beforeInstantiationResolved)) {
          // Make sure bean class is actually resolved at this point.
          确保当前bean是被解析了的

          if (!mbd.isSynthetic() && hasInstantiationAwareBeanPostProcessors()) {
              Class<?> targetType = determineTargetType(beanName, mbd);
              if (targetType != null) {

              后置处理器先尝试返回对象
                  bean = applyBeanPostProcessorsBeforeInstantiation(targetType, beanName);
                  if (bean != null) {
                  如果拿到了bean,应用后置处理器的postProcessBeforeInitialization()
                  相当于直接跳到了3.4的applyBeanPostProcessorsAfterInitialization
                      bean = applyBeanPostProcessorsAfterInitialization(bean, beanName);
                  }
              }
          }
          mbd.beforeInstantiationResolved = (bean != null);
      }
      return bean;
  }
2、applyBeanPostProcessorsBeforeInstantiation
拿到所有后置处理器,如果是InstantiationAwareBeanPostProcessor;就执行postProcessBeforeInstantiation()
@Nullable
protected Object applyBeanPostProcessorsBeforeInstantiation(Class<?> beanClass, String beanName) {
    for (BeanPostProcessor bp : getBeanPostProcessors()) {

    为什么要是InstantiationAwareBeanPostProcessor类型?
    因为它作为BeanPostProcessor的子接口,处理添加实例化前回调和实例化后
    但显式属性设置或自动装配发生之前的回调。 通常用于抑制特定目标bean的默认实例化

        if (bp instanceof InstantiationAwareBeanPostProcessor) {
            InstantiationAwareBeanPostProcessor ibp = (InstantiationAwareBeanPostProcessor) bp;
            //开始时一般都是返回null,除非你自己配置有别的,因为不返回null,那就是说你能
            //返回一个对象咯,没配置的话容器默认的BeanPostProcessor都是返回null。
            Object result = ibp.postProcessBeforeInstantiation(beanClass, beanName);
            if (result != null) {
                return result;
            }
        }
    }
    return null;
}
由于容器自带的InstantiationAwareBeanPostProcessor类型很多都是直接返回null,这里就看和本节相关的:
AnnotationAwareAspectJAutoProxyCreator:
3、AnnotationAwareAspectJAutoProxyCreator.postProcessBeforeInstantiation
  @Override
  public Object postProcessBeforeInstantiation(Class<?> beanClass, String beanName) {
1、构建缓存键,缓存的时候就用其作为key
      Object cacheKey = getCacheKey(beanClass, beanName);

2、判断当前bean是否在advisedBeans中(advisedBeans保存了所有需要增强的bean(需要加入额外功能的bean))
      if (!StringUtils.hasLength(beanName) || !this.targetSourcedBeans.contains(beanName)) {
          if (this.advisedBeans.containsKey(cacheKey)) {
              return null;
          }

3、判断当前bean是否是基础类型的Advice、Pointcut、Advisor、AopInfrastructureBean或者
是否是切面(@Aspect)
isInfrastructureClass(){

return (super.isInfrastructureClass(beanClass) ||
            (this.aspectJAdvisorFactory != null && this.aspectJAdvisorFactory.isAspect(beanClass)));
            }
--------------------------------------

          if (isInfrastructureClass(beanClass) || shouldSkip(beanClass, beanName)) {
              this.advisedBeans.put(cacheKey, Boolean.FALSE);
              return null;
          }
      }

     4、如果有自定义的目标资源,为其创建代理对象(config也没有,所以不创建)
      TargetSource targetSource = getCustomTargetSource(beanClass, beanName);
      if (targetSource != null) {
          if (StringUtils.hasLength(beanName)) {
              this.targetSourcedBeans.add(beanName);
          }
          Object[] specificInterceptors = getAdvicesAndAdvisorsForBean(beanClass, beanName, targetSource);
          Object proxy = createProxy(beanClass, beanName, specificInterceptors, targetSource);
          this.proxyTypes.put(cacheKey, proxy.getClass());
          return proxy;
      }

      return null;
  }
补充上述的shouldSkip
是否需要跳过,有两种返回结果
        1、获取候选的增强器(切面里面的通知方法)【List<Advisor> candidateAdvisors】
        List<Advisor> candidateAdvisors = findCandidateAdvisors();

        每一个封装的通知方法的增强器是InstantiationModeAwarePointcutAdvisor
        判断每一个增强器是否是AspectJPointcutAdvisor类型的,返回为true。
        我这里并不是AspectJPointcutAdvisor类型,所以返回false。

      for (Advisor advisor : candidateAdvisors) {
          if (advisor instanceof AspectJPointcutAdvisor &&
                  ((AspectJPointcutAdvisor) advisor).getAspectName().equals(beanName)) {
              return true;
          }
      }

        2、调用父类方法永远返回false
Advisor:

补充shouldSkip中的findCandidateAdvisors
  @Override
  protected List<Advisor> findCandidateAdvisors() {
      // Add all the Spring advisors found according to superclass rules.
      调用父类的findCandidateAdvisors,一般都是没有元素的
      List<Advisor> advisors = super.findCandidateAdvisors();
      // aspectJAdvisorsBuilder在前面的setFactoryBean创建过,主要看buildAspectJAdvisors

      if (this.aspectJAdvisorsBuilder != null) {
          advisors.addAll(this.aspectJAdvisorsBuilder.buildAspectJAdvisors());
      }
      return advisors;
  }
buildAspectJAdvisors
这个的实现很长,就不拉太多的代码过来了

1、获取容器内切面的bean名
List<String> aspectNames = this.aspectBeanNames;
一开始是没有任何切面的,因为还没扫描注册

2、如果上面的结果为空
if (aspectNames == null) {
在内部获取所有的beanNames
String[] beanNames = BeanFactoryUtils.beanNamesForTypeIncludingAncestors(
							this.beanFactory, Object.class, true, false);

进行三种判断,其中第三种判断为:
if (this.advisorFactory.isAspect(beanType)) {

如果是切面
aspectNames.add(beanName);添加到切面集合中

存入缓存
if (this.beanFactory.isSingleton(beanName)) {
                            this.advisorsCache.put(beanName, classAdvisors);
                        }
                        else {
                            this.aspectFactoryCache.put(beanName, factory);
                        }
}

赋值全局变量,返回
this.aspectBeanNames = aspectNames;
return advisors;
}

3、再一次获取的时候,因为之前可能会加入了切面,那么就不会为空,这是就进行遍历:
List<Advisor> advisors = new ArrayList<>();
		for (String aspectName : aspectNames) {
        获取缓存中的切面通知方法
        List<Advisor> cachedAdvisors = this.advisorsCache.get(aspectName);
			if (cachedAdvisors != null) {
				advisors.addAll(cachedAdvisors);
			}
        }
        然后将通知方法返回,就是上图的Advisor
所以,切面是怎么知道是切面;切面的通知方法有哪些;就是在这几步得到的,而且,这几步在我们自行加入容器的bean创建之前都会走一遍。(resolveBeforeInstantiation)
结束:
以上:AnnotationAwareAspectJAutoProxyCreator.postProcessBeforeInstantiation最终还是返回null。那么第2的applyBeanPostProcessorsBeforeInstantiation也是返回null。
即后置处理器并不能为这个bean返回一个代理对象,所以只能往下走,实例化bean。
4、initializeBean的applyBeanPostProcessorsBeforeInitialization和applyBeanPostProcessorsAfterInitialization
3.4中的这两个方法没展开说。当config这个bean到这里进行初始化的时候。
无论是applyBeanPostProcessorsBeforeInitialization还是applyBeanPostProcessorsAfterInitialization都有个特点就是:都会返回原来的bean,如果返回是null之后的BeanPostProcessor就不执行了,如果返回别的,可能会造成程序错误。所以在自定义BeanPostProcessor时,返回值一般都写传入的bean,除非你有别的需求。
applyBeanPostProcessorsBeforeInitialization
  @Override
  public Object applyBeanPostProcessorsBeforeInitialization(Object existingBean, String beanName)
          throws BeansException {

      Object result = existingBean;
      for (BeanPostProcessor processor : getBeanPostProcessors()) {
      //执行BeanPostProcessor的postProcessBeforeInitialization,返回为null,直接跳出循环
          Object current = processor.postProcessBeforeInitialization(result, beanName);
          if (current == null) {
              return result;
          }
          result = current;
      }
      return result;
  }
applyBeanPostProcessorsAfterInitialization
  @Override
  public Object applyBeanPostProcessorsAfterInitialization(Object existingBean, String beanName)
          throws BeansException {

      Object result = existingBean;
      for (BeanPostProcessor processor : getBeanPostProcessors()) {
          Object current = processor.postProcessAfterInitialization(result, beanName);
          if (current == null) {
              return result;
          }
          result = current;
      }
      return result;
  }

  applyBeanPostProcessorsAfterInitialization的实现和applyBeanPostProcessorsBeforeInitialization
  实现差不多,但我们这里要看的是具体的processor.postProcessAfterInitialization(result, beanName);

  在applyBeanPostProcessorsBeforeInitialization中,所有的BeanPostProcessors都没做什么处理,
  都是直接返回bean。

  但在applyBeanPostProcessorsAfterInitialization中,AnnotationAwareAspectJAutoProxyCreator有不同的实现。
AnnotationAwareAspectJAutoProxyCreator.postProcessAfterInitialization
  @Override
  public Object postProcessAfterInitialization(@Nullable Object bean, String beanName) {
      if (bean != null) {
          Object cacheKey = getCacheKey(bean.getClass(), beanName);
          if (this.earlyProxyReferences.remove(cacheKey) != bean) {
              return wrapIfNecessary(bean, beanName, cacheKey);
          }
      }
      return bean;
  }
wrapIfNecessary
protected Object wrapIfNecessary(Object bean, String beanName, Object cacheKey) {

//还是一堆判断,和之前的比postProcessBeforeInstantiation多了第二个
    if (StringUtils.hasLength(beanName) && this.targetSourcedBeans.contains(beanName)) {
        return bean;
    }
    if (Boolean.FALSE.equals(this.advisedBeans.get(cacheKey))) {
        return bean;
    }
    if (isInfrastructureClass(bean.getClass()) || shouldSkip(bean.getClass(), beanName)) {
        this.advisedBeans.put(cacheKey, Boolean.FALSE);
        return bean;
    }

    // 如果有要切入的业务逻辑,就为其创建一个代理对象

//1、获取所有增强器(通知方法)
    Object[] specificInterceptors = getAdvicesAndAdvisorsForBean(bean.getClass(), beanName, null);

    if (specificInterceptors != DO_NOT_PROXY) {

//2、保存当前bean在advisedBeans
        this.advisedBeans.put(cacheKey, Boolean.TRUE);

//3、创建代理对象:Spring自动决定
//JdkDynamicAopProxy(config);jdk的动态代理
//ObjenesisCglibAopProxy(config);cglib的动态代理

        Object proxy = createProxy(
                bean.getClass(), beanName, specificInterceptors, new SingletonTargetSource(bean));
        this.proxyTypes.put(cacheKey, proxy.getClass());
        return proxy;
    }
//加入到advisedBeans中,就是说,最后要创建的bean,最后都会加入到advisedBeans中。

    this.advisedBeans.put(cacheKey, Boolean.FALSE);
    return bean;
}
getAdvicesAndAdvisorsForBean创建aop的代理对象
  @Override
  @Nullable
  protected Object[] getAdvicesAndAdvisorsForBean(
          Class<?> beanClass, String beanName, @Nullable TargetSource targetSource) {
//找到适合这个bean的通知方法
      List<Advisor> advisors = findEligibleAdvisors(beanClass, beanName);
      if (advisors.isEmpty()) {
          return DO_NOT_PROXY;
      }
      return advisors.toArray();
  }
findEligibleAdvisors找到合适的通知方法
  protected List<Advisor> findEligibleAdvisors(Class<?> beanClass, String beanName) {
  //调用之前的寻找切面类通知方法的findCandidateAdvisors()方法,找到所有的通知方法
      List<Advisor> candidateAdvisors = findCandidateAdvisors();

//调用工具类找到合适这个bean的通知方法,即这里就可以知道这个bean到底要不要进行切入。
      List<Advisor> eligibleAdvisors = findAdvisorsThatCanApply(candidateAdvisors, beanClass, beanName);
      extendAdvisors(eligibleAdvisors);
      if (!eligibleAdvisors.isEmpty()) {
      //给增强器排序
          eligibleAdvisors = sortAdvisors(eligibleAdvisors);
      }
      //返回
      return eligibleAdvisors;
  }
以上是config配置类走的流程,我们应该关心的应该是mathCalculator是业务逻辑、mathCalculatorAop是切面类
当要实例化bean是mathCalculator时
在3.3中,createBeanInstance调用创建bean的方法就会变成instantiateUsingFactoryMethod(beanName, mbd, args);
因为我的mathCalculator是业务逻辑、mathCalculatorAop是切面类都是使用@Bean的方式在配置类中注册的,所以ioc容器会在这里使用工厂方法(config内的两个@Bean方法),利用反射执行两个方法创建bean
其他依旧一样;
因为mathCalculator是要被切入的。所以findEligibleAdvisors找到合适的通知方法。

 Object[] specificInterceptors = getAdvicesAndAdvisorsForBean(bean.getClass(), beanName, null);

 specificInterceptors就不会为null。那么就会执行创建代理对象的方法
 if (specificInterceptors != DO_NOT_PROXY) {
 ……
 }
 然后加入到缓存中
 this.advisedBeans.put(cacheKey, Boolean.FALSE);
    return bean;
结尾
至此,mathCalculator的aop动态代理创建完成。
至于mathCalculatorAop,它是切面类,会有@Aspect注解,所以在postProcessBeforeInstantiation的时候,进行判断:
if (isInfrastructureClass(beanClass) || shouldSkip(beanClass, beanName)) {
//会加入到advisedBeans中
				this.advisedBeans.put(cacheKey, Boolean.FALSE);
				return null;
			}
之后就进行照常的实例化就行,在wrapIfNecessary就会直接返回创建好的实例。
    if (Boolean.FALSE.equals(this.advisedBeans.get(cacheKey))) {
        return bean;
    }
获取拦截链-MethodInterceptor
容器初始化完成后,容器中保存了组件的代理对象(cglib增强后的对象),这个对象里面保存了详细信息(如所有的增强器,目标对象……)

执行目标方法:CglibAopProxy.intercept拦截目标方法的执行
mathCalculator.div(1, 0);
    @Override
    @Nullable
    public Object intercept(Object proxy, Method method, Object[] args, MethodProxy methodProxy) throws Throwable {
        Object oldProxy = null;
        boolean setProxyContext = false;
        Object target = null;
        TargetSource targetSource = this.advised.getTargetSource();
        try {
            if (this.advised.exposeProxy) {

                oldProxy = AopContext.setCurrentProxy(proxy);
                setProxyContext = true;
            }

            target = targetSource.getTarget();
            Class<?> targetClass = (target != null ? target.getClass() : null);

            1、根据ProxyFactory对象获取将要执行的目标方法拦截器链
            List<Object> chain = this.advised.getInterceptorsAndDynamicInterceptionAdvice(method, targetClass);
            Object retVal;

            如果没有拦截器链,直接执行目标方法

            if (chain.isEmpty() && Modifier.isPublic(method.getModifiers())) {

                Object[] argsToUse = AopProxyUtils.adaptArgumentsIfNecessary(method, args);
                retVal = methodProxy.invoke(target, argsToUse);
            }
            else {

    如果有拦截器链,把需要执行的目标对象、目标方法、拦截器链等所有信息传入创建一个
    CglibMethodInvocation对象并调用proceed()方法

                retVal = new CglibMethodInvocation(proxy, target, method, args, targetClass, chain, methodProxy).proceed();
            }
            retVal = processReturnType(proxy, target, method, retVal);
            return retVal;
        }
        finally {
            if (target != null && !targetSource.isStatic()) {
                targetSource.releaseTarget(target);
            }
            if (setProxyContext) {
                // Restore old proxy.
                AopContext.setCurrentProxy(oldProxy);
            }
        }
    }
getInterceptorsAndDynamicInterceptionAdvice
在这个方法中,要返回拦截器集合
List<Object> interceptorList = new ArrayList<>(advisors.length);
1、遍历所有的增强器,将其转为Interceptor:
MethodInterceptor[] interceptors = registry.getInterceptors(advisor);
2、getInterceptors内将增强器转为List
  @Override
  public MethodInterceptor[] getInterceptors(Advisor advisor) throws UnknownAdviceTypeException {
      List<MethodInterceptor> interceptors = new ArrayList<>(3);
      Advice advice = advisor.getAdvice();
      if (advice instanceof MethodInterceptor) {
          interceptors.add((MethodInterceptor) advice);
      }
      for (AdvisorAdapter adapter : this.adapters) {
          if (adapter.supportsAdvice(advice)) {
              interceptors.add(adapter.getInterceptor(advisor));
          }
      }
      if (interceptors.isEmpty()) {
          throw new UnknownAdviceTypeException(advisor.getAdvice());
      }
      return interceptors.toArray(new MethodInterceptor[0]);
  }
如果是MethodInterceptor,直接加入到集合中;如果不是MethodInterceptor,使用AdvisorAdapter将增强器转为MethodInterceptor。转换完成,返回MethodInterceptor数组。
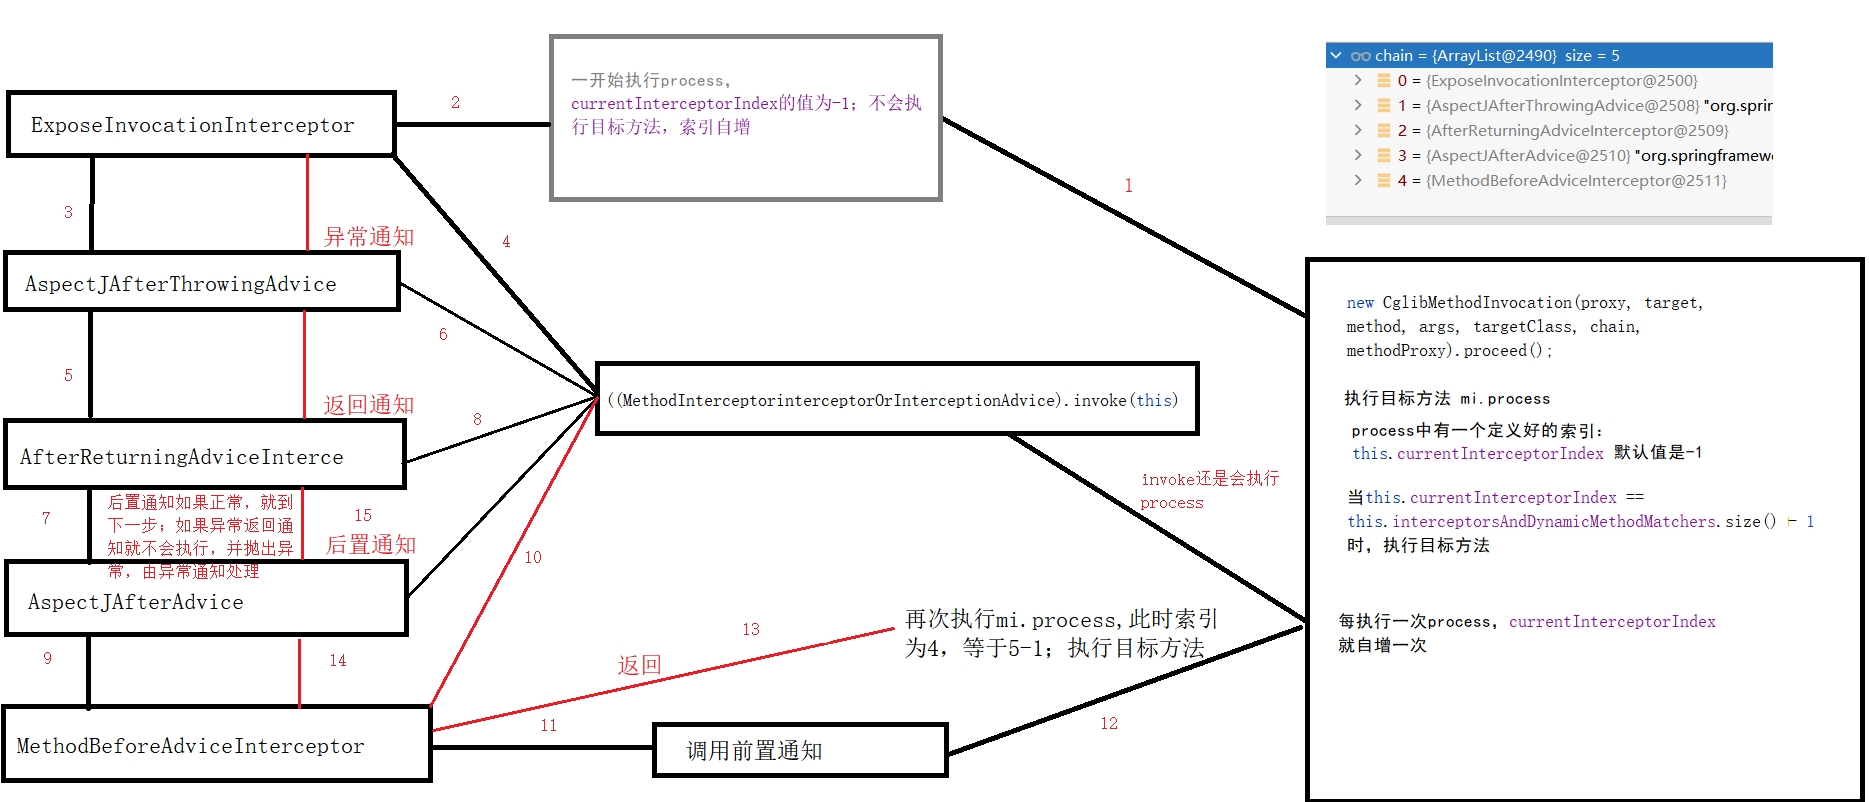
每一个通知方法被包装为方法拦截器,利用MethodInterceptor机制
链式调用通知方法

AOP原理总结
1、@EnableAspectJAutoProxy 开启AOP功能
2、@EnableAspectJAutoProxy 会给容器中注册一个组件 AnnotationAwareAspectJAutoProxyCreator
3、AnnotationAwareAspectJAutoProxyCreator 是一个后置处理器
4、容器的创建流程:
    1)、registerBeanPostProcessors() 注册后置处理器;创建AnnotationAwareAspectJAutoProxyCreator的对象
    2)、finishBeanFactoryInitialization() 初始化剩下的单实例bean
        1、创建业务逻辑组件 和 切面组件
        2、AnnotationAwareAspectJAutoProxyCreator后置处理器会拦截组件创建的过程
        3、组件创建完后,判断组件是否需要增强(添加被的功能)
        是,切面里面的通知方法,包装成增强器(Advisor);给业务逻辑组件创建一个代理对象(cglib)
5、执行目标方法:
    1)、代理对象执行目标方法
    2)、通过CglibAopProxy.intercept()进行拦截
        1、得到目标方法的拦截器链(增强器包装成拦截器_MethodInterceptor)
        2、利用拦截器链式机制,依次进入每一个拦截器进行执行
        3、效果:
        正常执行: 前置通知--目标方法--后置通知--返回通知
        出现异常: 前置通知--目标方法--后置通知--异常通知